


Optimizing Snowflake costs is a delicate issue. A reckless approach to your setup might catch the attention of the CTO or CFO once your monthly bill starts snowballing. Conversely, take too many shortcuts and you might introduce performance issues that will cost you more in the long term.
This is why it's important to stick to methods that will reduce your Snowflake costs without compromising the flow of your data. In this article, we'll take a look at some of these methods, but let's first explain the building blocks that drive your Snowflake costs.
Understanding Snowflake Pricing
AKS offers a variety of pricing models to choose from, each with its own advantages and disadvantages. Familiarizing yourself with the different models and how they function will make it easier to select an appropriate plan for your business.
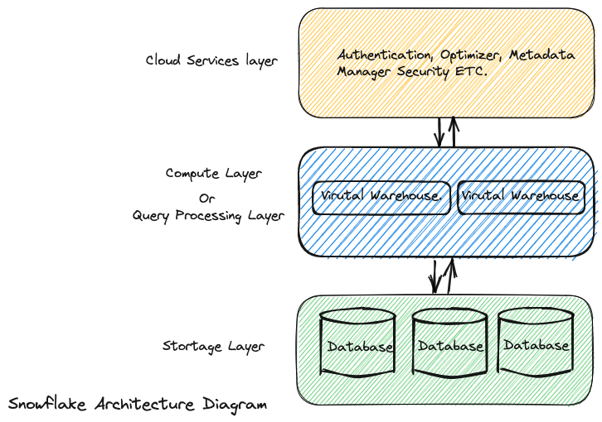
Snowflake architecture is based on three main components: Database storage, Query processing, and Cloud services.
Compute Costs
Snowflake uses virtual warehouses for processing queries. These are simply clusters of compute resources needed to complete a task, such as CPU, memory, and temporary storage. Compute costs are typically higher than storage costs, which is why it makes sense to focus on them first. These costs are based on:
- The size of the virtual warehouses
- The amount of time that they are running
Warehouses come in ten sizes, doubling in cost (or credits) between each tier. The larger a virtual warehouse is and the longer it runs, the higher your compute costs will be. Specifically, Snowflake calculates compute costs based on the following formula:
```
Compute Cost = Warehouse Size (in credits) x Time (in seconds) x Cost per Credit per Second
```
For example, consider a virtual warehouse with a size of 1,000 credits per hour, that runs for 10,000 seconds. If the hourly cost of that virtual warehouse is $5, then the compute cost for that usage would be:
```
Compute Cost = 1000 x 10000 x ($5/1000/3600) = $1.39
```
Note that credits are only consumed for what you use. If you stop the virtual warehouse during the waiting time, you won't incur any costs.
Storage Costs
Storage costs in Snowflake are based on the average number of bytes stored across database tables, clones, and failover regions. This includes files staged for bulk data loading and unloading as well as historical data retained for Time Travel and fail-safe.
When calculating storage fees, Snowflake charges a flat rate for a terabyte (TB) of data per month.
Both your computing and storage costs will depend on the Snowflake Edition you're using. It's important you choose the right Edition for your use case as they each come with a different cost per credit. Here's an overview of the available editions along with the features they include:

Snowflake Pricing Edition
Data Transfer Costs
You might encounter a few other Snowflake costs such as data transfer fees that arise when you move data between different regions or cloud providers.
Loading data into Snowflake from an external source incurs data ingress costs, which are billed by the cloud provider. Snowflake doesn't make a profit on this cost but charges it back to you. On the other hand, data egress costs are incurred when you transfer data out of Snowflake, for example by uploading data to cloud storage in a different region or replicating data to a Snowflake account in a different region.
At the end of the day, your Snowflake costs are based on your credit consumption, which is based on the number of tables you have, the queries you run on those tables, and the size of your warehouses.
That's why we'll mainly focus on strategies that impact these three cost drivers.

Rightsize Warehouses
One of the easiest ways of reducing your Snowflake costs is by changing the size of your virtual warehouses. More often than not, you'll be able to switch to a smaller warehouse size without suffering performance issues.
There's no magical formula for ensuring your compute cluster is the right size for the task; you'll have to test out a few different sizes to strike the right balance between cost and performance.
Decrease the Auto-Suspend Interval of Your Warehouses
Decreasing the auto-suspend period of your active warehouses might have a huge impact on your monthly Snowflake costs. Simply set the auto-suspend period to five minutes when creating a new warehouse.

You can also do this manually and set the interval to as low as 30 seconds by running the following command:
```
alter warehouse DBT_WH set auto_suspend=30;
```
Remember that every minute counts when you're trying to lower your Snowflake costs. It's all about setting a period that's long enough to execute back-to-back queries without incurring any extra downtime costs.
Use Automatic Clustering
One of the key features of Snowflake is Automatic Clustering, which interprets the data in your database and groups related data together. By clustering data, you can minimize the amount of data scanned during queries, thereby reducing costs.
For instance, say you have a table named “SalesData” that contains the purchase data of customer orders. Over time, the amount of data in the "Sales" table grows, making queries slower and more expensive. By default, Snowflake stores the data in the order it was inserted, which can result in inefficient data access patterns.
To optimize performance and reduce costs, you can enable Automatic Clustering on the "Sales" table using the following SQL command:
```
ALTER TABLE SalesData CLUSTER BY (customer_name);
```
Optimize Query Times
Whenever data is queried, you'll consume Snowflake credits. The trick here is to optimize query code to ensure smoother performance and lower costs. You can do this in a number of ways, including:
- Optimizing queuing: Snowflake lines up queries until resources are available. It’s not good for queries to stay queued too long, as they will be aborted. To prevent queries from waiting too long, we can set a query timeout:
```
ALTER SESSION SET STATEMENT_QUEUED_TIMEOUT_IN_SECONDS = 300;
``` - Filtering data before joining: You can enhance the performance of join queries by filtering data before joining. Prior to the join operation, you can decrease the quantity of data that needs to be processed, which will in turn speed up query times:
```
SELECT t1.col1, t2.col2
FROM table1 t1
JOIN table2 t2 ON t1.id = t2.id
WHERE t2.status = '1';
```
In this query, we are joining two tables on the ID column, but we are also adding a WHERE clause to filter active rows in table 2. This will limit the amount of data being processed in the join and can help optimize storage costs. - Reducing data size: Reducing the amount of data is another key method for query optimization. For example, say you want to analyze the sales data for a specific region, but you don't need all the columns in the table. To reduce the data size, you can create a new table that only contains the columns we need, and filter the data to only include the region we're interested in:
```
CREATE TABLE sales_data_filtered AS
SELECT date, region, product, sales_amount
FROM sales_data;
```
By only including the columns we need, we are reducing the size of the data and making it easier to process. - Query caching: The Snowflake query caching feature keeps query results in memory for a predetermined period of time (by default, 24 hours). Within that time frame, if the identical query is run again, Snowflake receives the outcome from the cache rather than running the query again. For regularly performed queries, this can result in significant speed benefits.
```
SELECT * FROM my_table
WHERE date >= '2022-01-01'
```
If this query is frequently executed and the underlying data in `my_table` does not change often, Snowflake can cache the result in memory to avoid having to re-execute the query each time. This can lead to significant performance improvements and lower query costs.
Minimize Data Transfer Costs
Compressing data before moving it between cloud providers or regions can make a massive difference in egress spending. Snowflake supports a variety of compression algorithms, including GZIP and LZ4.
To compress your data, you can use the following SQL command to create a compressed copy of a table:
```
CREATE TABLE <compressed_table_name> COMPRESSION = 'GZIP' AS SELECT * FROM <original_table_name>;
```
Alternatively, you can reduce your data transfer costs in Snowflake by transferring your data during off-peak hours. Snowflake charges higher rates for data transfer during peak usage hours. By scheduling your data transfer jobs during off-peak hours, you can take advantage of lower data transfer rates.
To schedule a data transfer job in Snowflake, you can use the following SQL command:
```
CREATE TASK <task_name> WAREHOUSE=<warehouse_name> SCHEDULE='<cron_schedule>' AS <sql_statement>;
```
Monitor Your Snowflake Spending
Without complete visibility into your Snowflake spending, you won't know which of the above strategies will make the biggest impact on your company's bottom line. This is where cloud cost monitoring tools like Finout comes in handy not just for your Snowflake environment but across your entire cloud infrastructure.
Our FinOps-certified platform gives you a detailed breakdown of your Snowflake costs down to specific queries, lets you set up cost alerts, and gives you rightsizing recommendations out of the box.
Looking for more ways to optimize your Snowflake costs? Head to our part two blog post for more techniques and insights.
Give it a try by booking a demo with our specialist today.

.svg)
