


The elastic scaling that is unleashed by Kubernetes' automated provisioning is profound. Applications can rely on the processing power and services they require on an as-you-need-it basis. However, that simple statement "as-you-need-it" reflects a significant DevOps investment to ensure that Kubernetes autoscaling is well configured.
Kubernetes is deliberately designed as a highly-customizable system. And, with great power comes great responsibility. This guide takes a deep dive into K8's autoscaling options to help save you from those misconfigurations now that means overspends later.
The Rhythmic Human
Businesses and the applications they provide exist to support a rhythmic creature, people. People sleep, eat, take time off, and are deeply embedded in their cultures which aligns their rhythms with each other.
For applications, this means that demand often differs according to the time of day, position in the week, fiscal season, weather season, and when a cultural or retail super event hits.
Provisioning vs. Over Provisioning
Whatever the underlying driver for the change in demand, DevOps must ensure that their application provisions capacity to respond to such variations.
This is what autoscaling enables. When implementing autoscaling, it is vital to ensure that a Kubernetes cluster is not over provisioned. Over provisioning cuts into the bottom line, whereas autoscaling has the potential to provide perfectly balanced resource provisioning and eliminate any under provisioning or over-provisioning.
Autoscaling Options
Note that a K8 deployment is managed by a controller – the “Deployment Controller'' which is configured to maintain a desired state. This strategy may be combined with other scaling-related options such as DaemonSets and ReplicaSets. DaemonSets ensures that a copy of a pod runs on all the nodes in the cluster. For example, if we want to run a storage demon on every node, DaemonSets ensures that this is deployed on each node within the cluster without requiring manual user intervention. While ReplicaSets control the number of identical pods (replicas) for a given container which in turn increases the availability of the application. These lie outside the scope of this article but must be considered when facilitating your scaled architecture.
Here we provide a granular focus on how to scale your applications. The Kubernetes cluster itself can be scaled with the Cluster Autoscaler. Also, because Kubernetes packages application resources into pods, these pods may be scaled vertically or horizontally.
A Vertical Pod Autoscaler (VPA) manages the CPU and memory provision for an individual pod; while a Horizontal Pod Autoscaler (HPA) manages the number of pods.
Cluster Autoscaler
The Cluster Autoscaler changes the actual node count in a cluster. It searches for pods that can’t be scheduled and upscale to support them, and searches for pods that can be consolidated into fewer nodes, i.e., downscales.
The Cluster Autoscaler can downscale the number of nodes by analyzing the pod usage on each node. If a pod can be reassigned to another node, that is handled and the node retired.
The signal that triggers the Cluster Autoscaler to upscale nodes is having pods in a pending state. You can control how often the Cluster Autoscaler checks for pending pods with the `--scan-interval` property.
For both upscaling and downscaling, the Cluster Autoscaler checks for any taints and tolerations, affinity configurations, and labels associated with each pod and node. The scaling will happen only if these conditions are met. For example, if the node affinity of a pod is set to a specific node and even if it's the only pod running on the node the cluster, autoscaler will not try to move the pod to a new node and retire the existing node.
Consider using Kyverno to apply policies to manage requested resources. By integrating these policies with your existing CI/CD pipeline policies, you can optimize your autoscaling.
Cluster Autoscaler Gotchas
There are several considerations to avoid gotchas when managing to scale with the Cluster Autoscaler:
- It works on abstraction at the infrastructure level – meaning that it needs access permissions. Best practice, therefore, means applying the principle of least privilege and using environment variables – not hard coding those credentials!
- To hand over a pod to an existing node and retire a node, the nodes must be compatible. This means that the nodes must have the same CPU and memory capacities because the Cluster Autoscaler simply assumes that they do and creates new nodes based on a template node that it creates.
- Ensure that all scheduled pods specify the resources they require. Cluster Autoscaler calculates resource usage by querying the requested resources. If the pods are not stating their requests, then they are not part of the calculation.
- Cluster Autoscaler does not identify unused computing resources. It orchestrates compatible pods and nodes only.
- The Cluster Autoscaler, when scaling up, needs to:
- a) identify the need for a new node
- b) launch a new node in the cluster
- c) register the node with the cluster control plane
- d) K8s allocate the pending pods to the new node
Note, that while this process itself may be efficient, how long it takes a cloud provider to provision the node could add delays.
- Cluster Autoscaler is not preconfigured on all managed Kubernetes platforms. In some instances, you will have to install and configure the Cluster Autoscaler..
- Cluster Autoscaler does not support local persistent volumes.
- Support the Cluster Autoscaler: the node that supports the Cluster Autoscaler pod must be provided with sufficient resources.
- Control the power of the Cluster Autoscaler! You don’t want it to shut down too much, avoid this by creating a pod disruption budget – to ensure the required minimum number of pods is maintained. Pod disruption budgets can be specified using an absolute number or a percentage:
spec:
minAvailable: 2
maxUnavailable: 1
minAvailable sets the number of pods that must be available after the eviction and .spec.maxUnavailable sets out the maximum number of pods that may be unavailable after the eviction.
- Avoid using the Cluster Autoscaler with more than 1000 Node Clusters. Best practice is to avoid cluster sprawl and ensure that the cluster footprint does not exceed the specified scalability limit.
HPA vs. VPA
Scaling can be implemented below the level of the cluster. Horizontal Pod Autoscaler (HPA ) provides an automated way to integrate and abstract pods at runtime to meet demand. HPA adds or deletes pods based on pod resource utilization. Vertical Pod Autoscaler (VPA) automates or decreases the pod container resource (CPU and memory) request to match actual usage, as per Figure 1:
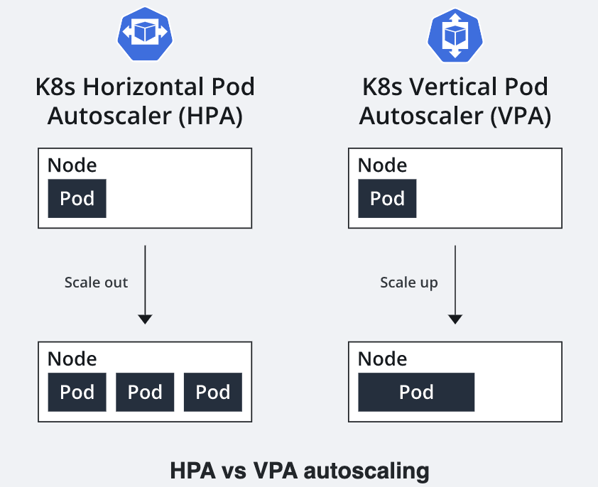
Figure 1 Horizontal Pod Autoscaler versus Vertical Pod Autoscaler.
HPA can be used together with Cluster Autoscaler to coordinate the scaling of pods and the number of nodes, as per Figure 2:
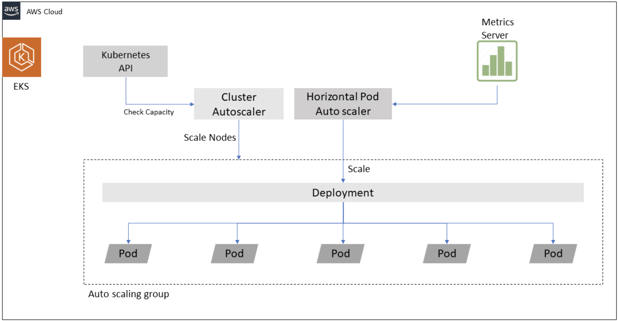
Figure 2 Horizontal Pod Autoscaler working with Cluster Autoscaler.
Horizontal Pod Autoscaler
It is unlikely that you will achieve success by predetermining the number of pod replicas manually. To meet application workload demand over time, Kubernetes provides HPA to optimize and automate this process. In Kubernetes, you can run multiple replicas of application pods utilizing ReplicaSet (Replication Controller) by configuring the number of replica counts in the Deployment object. Note that HPA works for the pods that are either stateless or support autoscaling out of the box. Workloads that can’t run as multiple instances/pods cannot use HPA.
The cost savings that HPA enables can be significant. HPA monitors performance metrics to start or stop instances as they meet threshold limits. HPA can increment or decrease pod replicas based on metrics like pod CPU utilization or pod Recollection utilization, or other custom metrics like API calls. By configuring such pod target metrics, the HPA controller calculates the mean of the desired metric across all the active pods as a trigger to implement or retire pods.
The API aggregation layer provides the required metrics to HPA. These may include custom metrics or even external metrics if required.
Now, this is where the functionality gets even more interesting, because, with custom and external metrics, the target can be set up to a static value – rather than the mean. That means that for a custom object (i.e., an object in the same namespace) metric and with external metrics, the target can be “value”.
The external metric may be provided by any 3rd-party monitoring system.
Vertical Pod Autoscaler
The VPA is an excellent choice for workloads that temporarily increase their resource demands, i.e., RAM or CPU. Maintaining resources for the upper-end of the demand spectrum can be a costly waste of resources. And, as the K8s default scheduler tends to overcommit a node’s memory and CPU support, this adds to the challenge. VPA’s temporary increase in resource provision can be an efficient way to support your application.
Because a pod’s resource limits can’t be changed ad-hoc, new pods must be created with the updated resource target. VPA deployment has three moving parts:
- Recommender
- Updater
- Controller
The “Recommender” is the monitor of the system, which passes the resource usage to the “Updater”. The actual implementation is handed over to the “Controller”. Admission controllers may "validate", "mutate", or both. This means that mutating controllers can actively modify related objects according to their targets; validating controllers do not. Typically both controllers are run, first the mutating controller, then the validator.
VPA can be used together with Cluster Autoscaler; then if VPA makes a resource request which exceeds the availability, Cluster Autoscaler can add new nodes to support the pending pods.
VPA also has a useful feature that helps understand resource requirements at the pod level. If you configure VPA with updateMode: Off, it will provide recommended CPU and memory requests. By studying these, you have a base level from which to provision the workloads and understand resource demand.
Pod Autoscaling Gotchas
With the horizontal (HPA) and vertical (VPA) scaling options for pods, the #1 gotcha has got to be:
- Remember that warning from 5) above: when there is a need to provision new resources, the time required to scale will depend on the cloud provider's responsiveness to creating the required resources.
Also,
2. Mitigate against HPA and VPA policy clashes. In fact, it is probably safest not to use both – unless HPA is purely focused on custom or external metrics. If there is a policy overlap, there might be instances where the cluster will try to both horizontally and vertically scale the same workload; this not only disrupts the pod availability but unnecessarily increases the resource usage leading to cost increases.
HPA Gotchas
- If you wish to apply HPA, the application’s architecture must be designed such that the workload can be distributed across multiple virtual machines (VMs).
- Supporting the HPA controller means providing it with access to the pod resource metrics, which means the cluster will require a metrics server. All resource requests and resource metrics must be available for every pod. The inbuilt metric server add-on provides this capability and aggregates information about all resources within the cluster.
- Setting up the controller depends on the way your Kubernetes cluster is deployed and how the API server is started.
- Securing an external metrics API can be a challenge. It is considered best practice to use custom metric targets instead of external metrics as it is easier for cluster administrators to secure the custom metrics API.
- The dynamic nature of the metrics being evaluated by HPA can result in scaling events that occur in quick succession. This results in “thrashing” – where a variety of replicas fluctuates in and out of existence. To avoid this, configure a cool-down period via the --horizontal-pod-autoscaler-downscale-stabilization flag passed to the kube-controller-manager
VPA Gotchas
- There is a limit to how effective throwing more CPU or RAM at an instance can be. Real-world limitations are likely to creep in. Also, there may be limits to the CPU and RAM available from your VM supporting your cluster instance.
- The VPA version and the Kubernetes versions must be compatible.
- Ensure that the Kubernetes API server is properly configured with the right set of admission controllers.
Conclusion
While the auto-scaling features of Kubernetes are without a doubt powerful and give you the control you need, setting them up is not a trivial task. DevOps must have a solid understanding of their pod and container needs and be able to set realistic constraints.
We are, of course, not impartial observers of the real-world constraints of implementing Kubernetes here at Finout! Finout's Kubernetes cost monitoring tools empower you to precisely allocate your Kubernetes costs to your business unit. Have you taken it for a test drive yet? Get early access to Finout today.

.svg)
